
Perfecting Buttermilk Dosas on a Cast Iron Tawa: A Flavorful Breakfast Delight
Imagine waking up to the enticing aroma of freshly cooked Buttermilk Dosas – crispy on the outside, soft on the inside, and oozing with flavor. If you’re eager to learn the art of crafting these divine dosas, you’ve come to the right place. In this guide, we’ll walk you through the steps to make these dosas using a trusty cast iron tawa. Whether you’re a culinary enthusiast or a curious beginner, get ready to embark on a delicious journey that marries tradition and modernity for a memorable breakfast treat.
Ingredients:
Before you set off on your culinary adventure, gather these ingredients:
For the Dosa Batter:
1. 2 cups rice
2. 1/2 cup urad dal (black gram lentils)
3. 1/4 cup flattened rice (poha)
4. 1/2 cup sour buttermilk
5. 1/2 teaspoon fenugreek seeds (methi seeds)
6. Water (for soaking and grinding)
7. Salt (to taste)
For the Buttermilk Dosa:
1. Prepared dosa batter
2. Finely chopped onions, tomatoes, and green chilies (optional)
3. Freshly chopped coriander leaves (optional)
4. Oil or ghee (clarified butter) for cooking
Step-by-Step Guide to Crafting Buttermilk Dosas on a Cast Iron Tawa:
1. Soaking the Ingredients:
o Start by giving the rice, urad dal, and fenugreek seeds a good rinse.
o Let the rice and fenugreek seeds soak in one bowl and the urad dal in another. Cover them with water and let them soak for about 4-6 hours.
o The flattened rice (poha) needs a soak too – around 20-30 minutes before grinding.
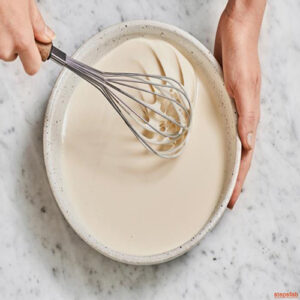
2. Creating the Batter:
o Once soaked, grind the rice, urad dal, and fenugreek seeds separately to a smooth consistency using a grinder. Gradually add water as needed.
o Mix the rice and urad dal pastes in a big bowl. Add the tangy buttermilk and salt. Give it a good stir and allow it to ferment for 8-10 hours or overnight. The fermentation adds that wonderful flavor and texture.
3. Crafting Your Dosas:
o After fermentation, give the batter a gentle stir. If it’s too thick, add a touch of water to make it just right for pouring.
o Heat your cast iron tawa over medium heat. Allow it to warm up gradually. The tawa’s heat is crucial for even cooking and achieving the perfect crispiness.
4. Cooking with Precision:
o Once your tawa is sufficiently heated, ladle some dosa batter onto the center.
o Use the back of the ladle to spread the batter in a circular motion, creating a thin dosa.
o Drizzle a bit of oil or ghee around the edges and on top for that added burst of flavor.
5. Golden Perfection:
o Let the dosa cook until the edges turn a beautiful golden brown and become irresistibly crisp.
o Gently lift the edges using a flat spatula and fold the dosa in half or roll it up – whichever you prefer.
o Continue cooking for a few more moments until the dosa reaches its peak golden color and delightful crispiness.
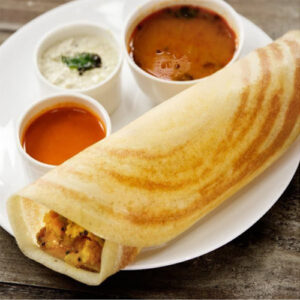
6. Savoring Your Creations:
o Carefully remove the dosa from the tawa and serve it piping hot with coconut chutney, zesty sambar, or any accompaniment that tickles your taste buds.
Top Tips for Dosa Mastery:
1. Tawa Temperature: Ensure your cast iron tawa is properly heated before you start pouring the batter. Test it by sprinkling a few drops of water – they should sizzle and evaporate.
2. Batter Consistency: Aim for the right batter consistency – not too thick and not too thin. This consistency helps you spread the batter evenly.
3. Flavor Through Fermentation: Allow your batter to ferment well. The longer it ferments, the richer the flavor and texture of your dosas.
4. Oil or Ghee Magic: Using a bit of oil or ghee on the tawa enhances both the flavor and the desired crispiness.
5. Spreading Grace: If you’re new to dosa-making, practice spreading the batter using the back of the ladle. It takes a bit of practice, but soon you’ll be an expert!
6. Get Creative: While classic buttermilk dosas are divine, don’t hesitate to experiment with toppings like finely chopped onions, juicy tomatoes, colorful bell peppers, or fragrant herbs.
7. Enjoy the Journey: Your initial dosa might not be flawless – and that’s perfectly alright! As with any skill, dosa-making becomes better with practice.
Cast Iron Tawa:

The Time-Tested Classic: The cast iron tawa brings with it a sense of nostalgia and heritage. Its seasoned surface imparts a unique flavor to the dosas, infusing them with that unmistakable smoky essence. This age-old technique not only ensures even cooking but also adds a touch of authenticity to your breakfast spread.
Exploring Regional Flavors: Every region in India has its own take on dosas, and using a cast iron tawa allows you to explore these diverse flavors. From the fiery spices of the South to the subtle sweetness of the North, each dosa tells a story of its origin. The cast iron tawa becomes a canvas where you can paint these vibrant tales through your culinary creations.
Cooking as an Art: Crafting Buttermilk Dosas on a cast iron tawa is akin to practicing an art form. The sizzle as the batter touches the tawa, the careful spreading of the batter to achieve the perfect thinness – each step is a dance of precision. And when the dosa is flipped, the satisfaction of that golden transformation is a reward only a cast iron tawa can provide.
Nurturing Traditions: Using a cast iron tawa for dosa-making isn’t just about cooking; it’s about carrying forward a tradition. It’s about passing down a piece of culinary heritage from one generation to the next. The simple act of making dosas on a cast iron tawa becomes a way to connect with your roots, honoring the culinary legacy that defines Indian cuisine.
Conclusion:
Creating Buttermilk Dosas on a cast iron tawa brings a slice of tradition and a burst of flavor to your kitchen. The blend of tangy buttermilk and the satisfying crunch of the dosa is an experience that truly tantalizes the taste buds. Remember, dosa-making is both an art and a science, so enjoy the process and embrace the journey towards becoming a dosa maestro. Happy cooking, and may your mornings be filled with delicious and crispy breakfast delights! Your breakfast table is about to witness a revolution of flavors.
One Reply to “Perfecting Buttermilk Dosas on a Cast Iron Tawa: A Flavorful Breakfast Delight”