
Quick and Easy Instant Rava Dosa Recipe
Detailed Steps for making delicious instant rava dosa on a non-stick tawa. This recipe is easy to follow and yields crispy dosas that everyone will love!
Ingredients:
1 cup fine semolina (rava)
1/2 cup rice flour
1/4 cup all-purpose flour (maida)
1/2 cup yogurt (curd)
1 small onion, finely chopped
1-2 green chilies, finely chopped
A handful of freshly chopped cilantro (coriander leaves)
1/2 teaspoon cumin seeds
1/2 teaspoon crushed black pepper
Salt, to taste
Water, as needed
Oil, for cooking the dosas
Process:
Mixing the Batter:
Begin by grabbing a mixing bowl. Measure out the fine semolina (rava), rice flour, and all-purpose flour (maida). Combine these flours in the bowl and give them a gentle mix to ensure even distribution.
Adding Yogurt and Water:
Now, introduce the yogurt (curd) to the dry mixture. Yogurt lends a tangy flavor and contributes to the softness of the dosas. As you add yogurt, slowly incorporate water while stirring the mixture. The goal is to create a batter that’s akin to buttermilk in terms of consistency. It should flow easily and spread effortlessly on the tawa.
Infusing Flavors:
Next, elevate the flavor profile of your rava dosa by adding finely chopped onions, green chilies, and a generous handful of freshly chopped cilantro (coriander leaves). These elements not only enhance the taste but also introduce a delightful crunch and aromatic element. Incorporate cumin seeds and crushed black pepper to infuse a touch of spicy warmth. Add a pinch of salt to season the batter according to your taste preferences.
Allowing the Batter to Rest:
Grant the batter a brief resting period of around 15-20 minutes. During this interval, the semolina will absorb the liquids, leading to a slight thickening of the batter. This resting duration is crucial to achieve the desired texture for your dosas.
Preparing the Tawa:
While the batter is taking its time to rest, place a non-stick tawa (griddle) on the stovetop and heat it over medium-high flames. You can opt to lightly grease the tawa with a few droplets of oil, although it might not be necessary, especially if your tawa is of high quality.
Adjusting Batter Consistency:
After the resting period, give the batter a thorough stir. Depending on the duration of resting and the absorption of liquids, the batter may have thickened slightly. To achieve the characteristic thin and lacy texture associated with rava dosas, you might need to fine-tune the consistency by incorporating a small amount of water. The batter should glide effortlessly when poured onto the tawa.
Crafting the Dosa:
Once the tawa has reached an ideal temperature, pour a ladleful of the batter from the outer edge of the tawa, moving it in a circular motion. The batter will naturally spread, resulting in a thin and lacy dosa. It’s important to note that the batter might spread unevenly, which is a common characteristic of rava dosas.
Adding Oil and Cooking:
To achieve the desired crispy texture, drizzle a touch of oil around the edges of the dosa and within the holes that form. Let the dosa sizzle and cook over medium-high flames. As it cooks, you’ll observe the edges transforming into a gorgeous golden brown hue, indicating that it’s time to flip the dosa.
Flipping and Presenting:
With a gentle flick of the wrist, lift the edges of the dosa using a flat spatula and execute a graceful flip. The entire dosa should exhibit a crispy, golden appearance. Allow the other side to cook for a brief span, ensuring it attains equal crispiness.
Plating Your Creation:
Once both sides have achieved culinary perfection, delicately remove the dosa from the tawa and arrange it on a plate. Feel free to fold it in half or roll it up – the choice is entirely yours!
Repetition and Culinary Harmony:
Continue this rhythmic process with the remaining batter, crafting one delectable dosa after another. Prior to pouring the batter for each new dosa, make sure to give it a good stir to guarantee an even dispersion of all the scrumptious ingredients.
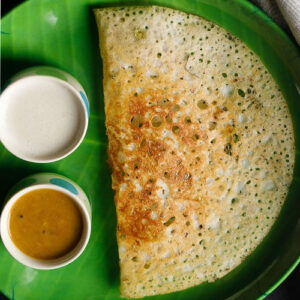
Serving Ideas:
Your hot and crispy instant rava dosas are now primed for indulgence. Elevate your dosa experience by pairing them with your preferred accompaniments, such as velvety coconut chutney, tangy sambar, or any dip that tantalizes your taste buds. The combination of the crispy dosas and the mouthwatering sides promises an unforgettable culinary adventure.
Mastery Through Practice:
Embrace the process, and don’t fret if your inaugural dosas aren’t a visual masterpiece. Creating rava dosas requires a dash of practice, particularly when it comes to the art of pouring and spreading the batter. With each dosa you make, you’ll refine your technique and effortlessly produce those lacy, crispy delights that are emblematic of rava dosas.
Conclusion:
The journey of crafting instant rava dosas on a non-stick tawa is an enchanting exploration of flavors and textures. By harmonizing simple ingredients with a touch of artistry, you’ll orchestrate dosas that are both crispy and brimming with flavor. With a dash of practice, you’ll soon be proudly serving these irresistible dosas, captivating the palates and hearts of all who savor your culinary creations. So, roll up your sleeves, gather your ingredients, and embark on the joyous voyage of crafting homemade instant rava dosas that truly embody the magic of the culinary arts!
One Reply to “Quick and Easy Instant Rava Dosa Recipe”